 Save to Pinterest
 My neighbor handed me a warm muffin through her kitchen window one Saturday morning, steam still rising from the paper liner, and I bit into this unexpected collision of peanut butter and guava that somehow tasted like comfort wrapped in nostalgia. She'd been experimenting with tropical flavors all summer, she said, tired of the same blueberry routine. That first bite—the way the creamy peanut butter base gave way to those pockets of tart-sweet guava—made me understand why she'd been so excited about it.
I made these for a book club gathering on a rainy Tuesday, mostly because I wanted an excuse to buy that jar of guava paste I'd been eyeing at the Latin market. Three people asked for the recipe before they'd even finished their first muffin, and one friend confessed she'd never thought to pair peanut butter and guava together until that moment, which somehow felt like a small discovery we'd made in my kitchen.
Ingredients
- All-purpose flour (2 cups): This is your foundation—make sure it's fresh and measured correctly by spooning into a measuring cup rather than scooping straight from the bag, which packs it down and throws off your ratios.
- Creamy peanut butter (1/2 cup): Use the kind that's just peanuts and salt, not the extra-stirred type, as it gives you better texture and a more honest peanut flavor in every bite.
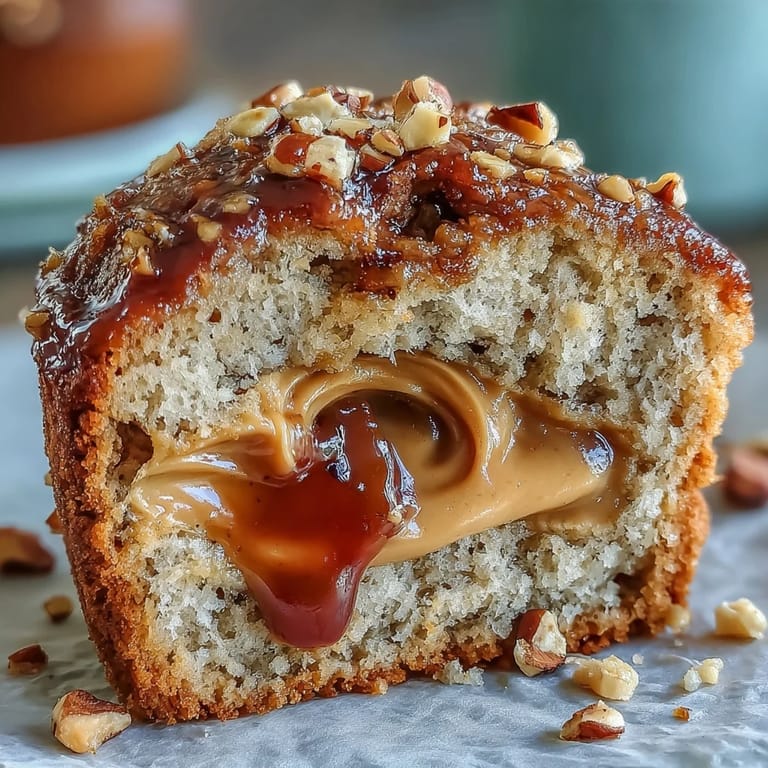
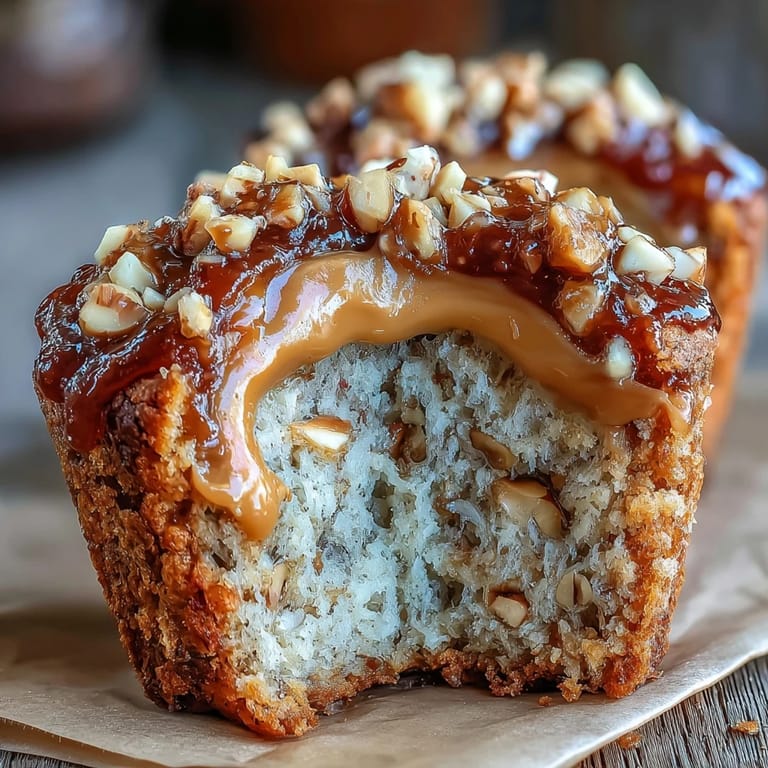
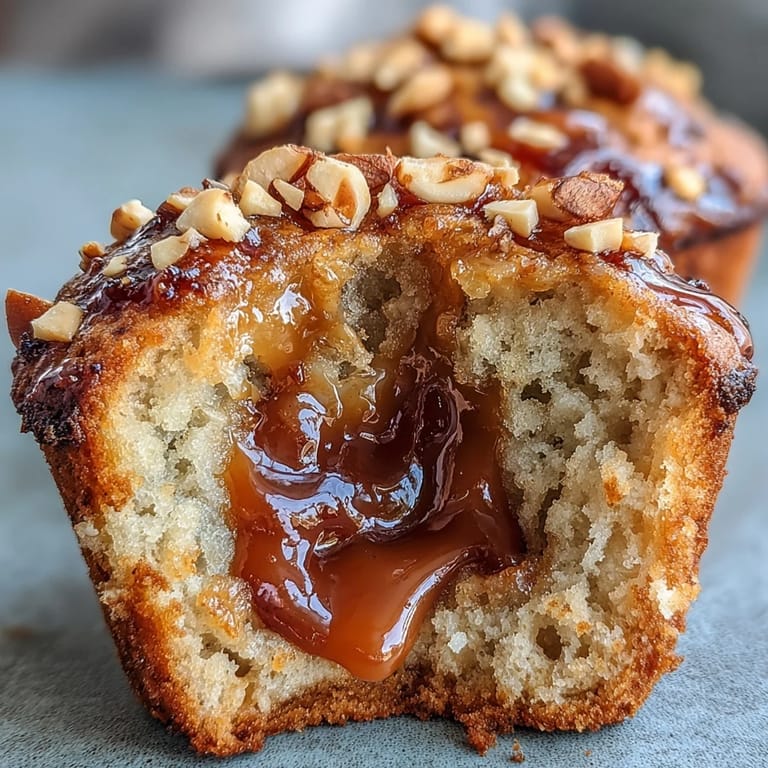
- Guava preserves (2/3 cup): This is where the magic happens—look for the real stuff with visible seeds, not the clear jelly, because those little flecks make all the difference in taste and texture.
- Unsalted butter (1/2 cup, melted): Let it cool slightly before mixing so it doesn't cook the eggs when you add them; this step sounds small but it keeps your muffins tender instead of dense.
- Granulated sugar (1 cup): This sweetness balances the tartness of the guava, so don't skip it even if you're thinking about reducing it.
- Eggs (2 large): They bring structure and lift to what could otherwise feel heavy and one-note.
- Whole milk (1 cup): This keeps everything moist and prevents the peanut butter flavor from becoming greasy or overwhelming.
- Baking powder and baking soda (1 tsp and 1/2 tsp): These two work together—one gives immediate rise, the other activates with the milk for a secondary lift that keeps the crumb open and light.
- Roasted peanuts, chopped (1/4 cup optional): If you use them, they add a textural surprise and a little nod to the whole PB situation happening inside.
Tired of Takeout? 🥡
Get 10 meals you can make faster than delivery arrives. Seriously.
One email. No spam. Unsubscribe anytime.
Instructions
- Set up your stage:
- Preheat your oven to 350°F and line your muffin tin with paper liners—this step takes barely a minute but saves you from sticking disasters later. If you don't have liners, a light grease with butter works fine, though you'll want to be gentle when removing them.
- Mix the dry team:
- In a medium bowl, whisk together your flour, baking powder, baking soda, and salt until they're evenly distributed and there are no little flour pockets hiding in the corners. This is important because it ensures every muffin rises with the same enthusiasm.
- Cream the peanut butter mixture:
- In a larger bowl, beat together the peanut butter, cooled melted butter, and sugar until the whole thing looks light and slightly fluffy, about 2 minutes with an electric mixer. You're not making a mousse here, but you are incorporating enough air that the batter will have somewhere to expand in the oven.
- Add the eggs one at a time:
- Drop in your first egg and mix until it disappears completely before adding the second—this prevents lumps and helps everything emulsify properly. Then stir in your milk and vanilla extract until the wet mixture looks smooth and slightly glossy.
- Fold it all together gently:
- This is the moment where patience pays off: gradually add your dry ingredients to the wet ingredients, folding with a spatula rather than beating, until the flour just disappears. Overmixing is the enemy here because it develops gluten and turns your muffins tough and dense instead of tender and broken-apart-able.
- Fill the cups strategically:
- Scoop batter halfway up each muffin cup, then place a generous teaspoon of guava preserves right in the center of each one. Top with remaining batter so the preserves are hidden, which keeps them from bubbling out all over your oven and creates that delicious surprise when someone bites through.
- Optional peanut finish:
- If you're using chopped roasted peanuts, sprinkle them on top right before the muffins go into the oven so they toast slightly and become even more flavorful.
- Bake and trust:
- Slide them into the oven for 20 to 22 minutes—look for the moment when they're golden on top but still have a tiny bit of give when you press gently. The toothpick test here is important, but insert it into the edge or side of a muffin, not the center where the preserves are, or you'll get a false reading.
- Cool with restraint:
- Let them sit in the pan for 5 minutes so they set just enough to handle, then transfer them to a wire rack where they can cool completely without sweating in their own steam. This prevents them from becoming dense and keeps that delicate crumb structure intact.
 Save to Pinterest
 My daughter dunked one of these in her hot chocolate one morning and announced very seriously that this was how she wanted her breakfast to be forever, which made me laugh because that's exactly when you know a recipe has crossed from just-good to something people actually care about. That small moment in the kitchen reminded me that baking isn't just about following steps—it's about creating something that makes people light up a little.
Why the Tropical-Meets-Nostalgic Flavor Matters
There's something about pairing peanut butter with guava that feels both completely obvious and totally unexpected at the same time. It's like someone finally said out loud what your taste buds were already thinking—that these two flavors had been waiting to meet this whole time. The tartness of the guava cuts through what could be the heaviness of the peanut butter, while the peanut butter adds richness that keeps the guava from feeling one-dimensional or overly sweet.
Storage and Keeping Them Fresh
These muffins stay moist and delicious for three days in an airtight container on the counter, though honestly they rarely last that long in my house. If you want to get ahead, you can freeze them in a freezer bag for up to two months, and they thaw beautifully at room temperature in about an hour—or you can warm them in the microwave for 30 seconds if you want that fresh-from-the-oven feeling without the actual work.
Variations Worth Trying
Once you've made these the traditional way, you'll start imagining all sorts of flavor combinations that could work with this same base. The formula is flexible enough that you can swap the guava for strawberry jam, raspberry preserves, or even a simple apricot spread if that's what calls to you. Some people add a tablespoon of passion fruit pucker or a tiny pinch of cardamom to the wet ingredients, which adds a subtle warmth that makes people pause and ask what that secret note is.
- Try using natural peanut butter with the oil stirred in for an even deeper, less processed peanut taste.
- A sprinkle of cinnamon sugar on top before baking gives you a little textural contrast and sweet crunch.
- If you can't find guava preserves, passion fruit curd or even a mix of peanut butter and jelly works beautifully in a pinch.
 Save to Pinterest
 These muffins are proof that the simplest ideas, the ones that sound obvious once you hear them, are often the most delicious. Make a batch this weekend and watch what happens when someone takes that first bite.
Frequently Asked Questions
- → Can I use natural peanut butter instead of regular creamy peanut butter?
Yes, natural peanut butter works well in this mixture. Just make sure to stir it thoroughly before measuring, as the oil tends to separate. You may need to adjust the sugar slightly since natural peanut butter is less sweet than regular varieties.
- → What other fruit preserves can I substitute for guava?
Strawberry, raspberry, or blackberry jam make excellent substitutes for a classic PB&J flavor profile. Apricot preserves also work beautifully and complement the peanut butter nicely. Use any high-quality fruit preserve you enjoy.
- → How do I know when the muffins are done baking?
Insert a toothpick into the edge of the muffin (avoid the center where the preserves are). If it comes out clean or with just a few moist crumbs, they're ready. The tops should be golden brown and spring back when gently touched.
- → Can I make these muffins gluten-free?
Yes, substitute the all-purpose flour with a 1:1 gluten-free flour blend that contains xanthan gum. The texture may be slightly denser but still delicious. Ensure your baking powder and other ingredients are certified gluten-free.
- → How should I store these muffins?
Store cooled muffins in an airtight container at room temperature for up to 3 days. For longer storage, refrigerate for up to a week or freeze individually wrapped for up to 2 months. Thaw frozen muffins at room temperature or warm gently in the microwave.
- → Can I make this batter ahead of time?
The batter is best used immediately since the baking powder activates when mixed with wet ingredients. However, you can prepare the dry and wet ingredients separately the night before, then combine and bake fresh in the morning.